There are no items in your cart
Add More
Add More
| Item Details | Price | ||
|---|---|---|---|

How to Create Your First Virtual Machine (VM) in Google Cloud Platform (GCP)
Complete Step-by-Step Visual Guide: Enabling APIs, Compute Engine Setup, Firewall Security Rules & In-Browser SSH Access
Virtual Machines are the foundational building block of cloud computing. In Google Cloud Platform (GCP), virtual servers are managed under Compute Engine, an Infrastructure as a Service (IaaS) component that lets you run Linux and Windows workloads on Google's ultra-fast global infrastructure.
In this guide, you will learn the exact end-to-end visual workflow: from enabling required API services, configuring your first VM instance, securing it with VPC Firewall Rules (GCP's Security Groups), to connecting live via Browser SSH.
e2-micro / e2-medium).my-web-project or my-first-devops-project).In newly created Google Cloud projects, APIs are disabled by default. Before creating any virtual machines, you must enable the Compute Engine API (compute.googleapis.com).
Compute Engine API and click on the result.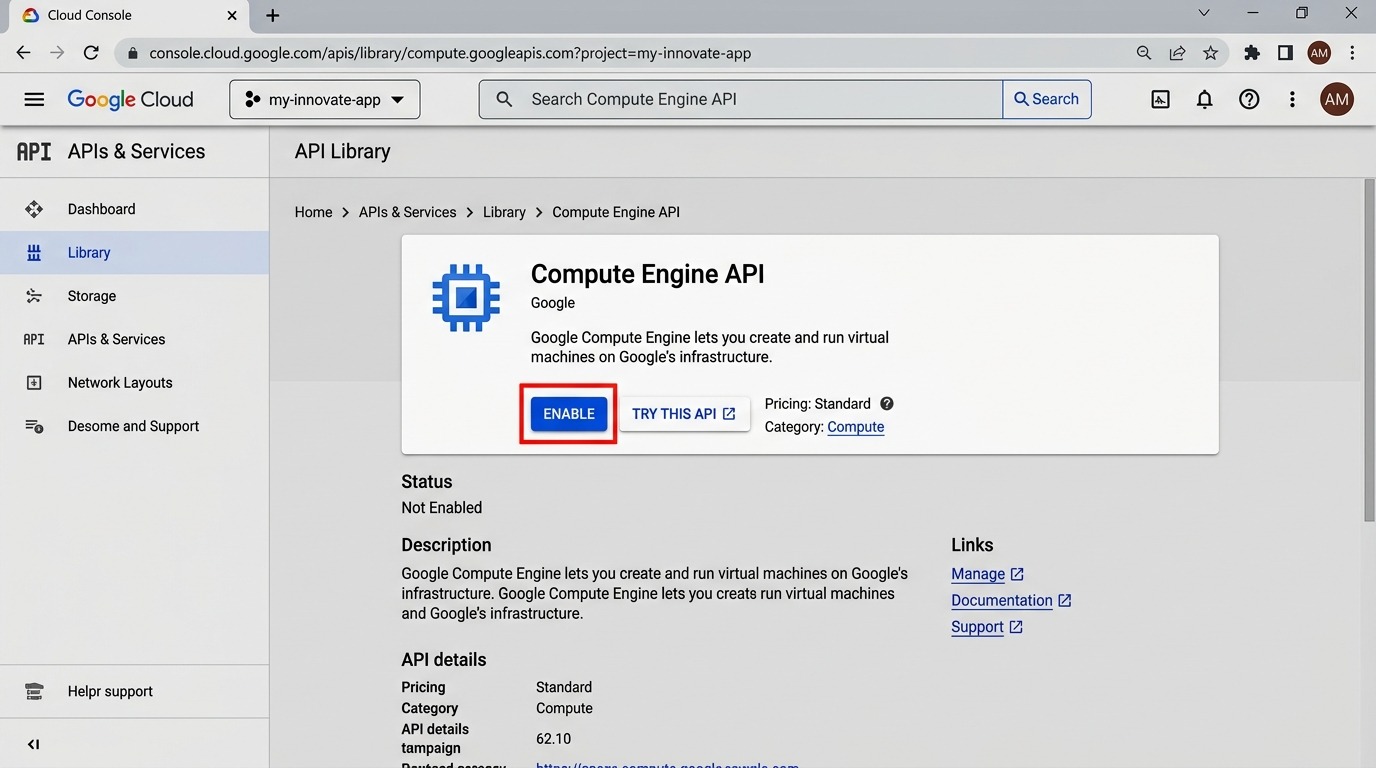
Figure 1: Google Cloud Console — Enabling the Compute Engine API in the API Library.
If you prefer using the command line, you can click the Cloud Shell icon in the top header and run:
gcloud services enable compute.googleapis.com
Navigate to Compute Engine > VM instances, and click + CREATE INSTANCE. Configure the following parameters:
devops-web-server-01us-central1 (Iowa) & Zone: us-central1-aE2 (Cost-optimized, versatile VMs)e2-micro (2 vCPU, 1 GB memory) — Free Tier eligible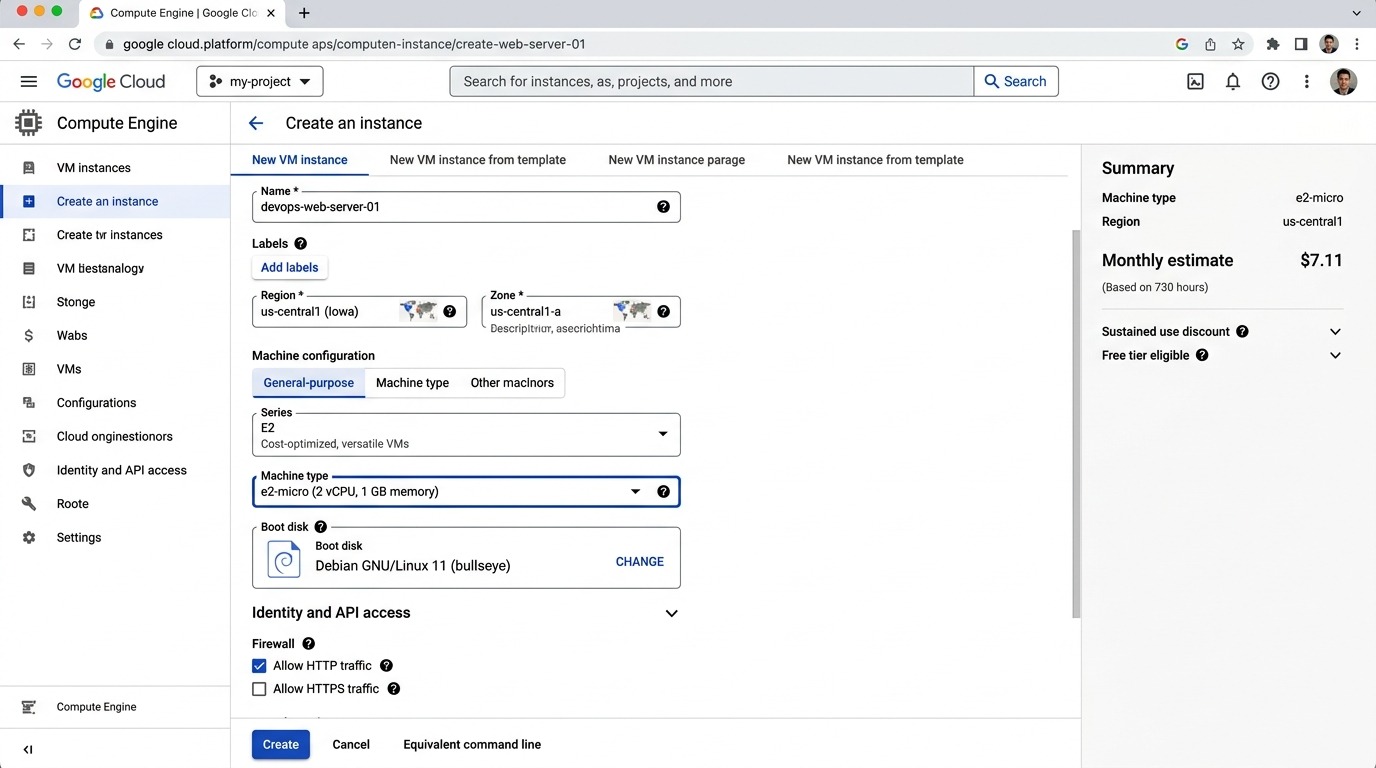
Figure 2: Complete Compute Engine Instance Configuration: Name, Region, Series E2, Machine Type e2-micro, and Firewall.
In Google Cloud, network security is managed via VPC Firewall Rules and Target Tags. To allow incoming traffic to your web apps or custom applications (e.g. port 80, 443, 8080, or 3000):
allow-web-traffic0.0.0.0/080, 443, 8080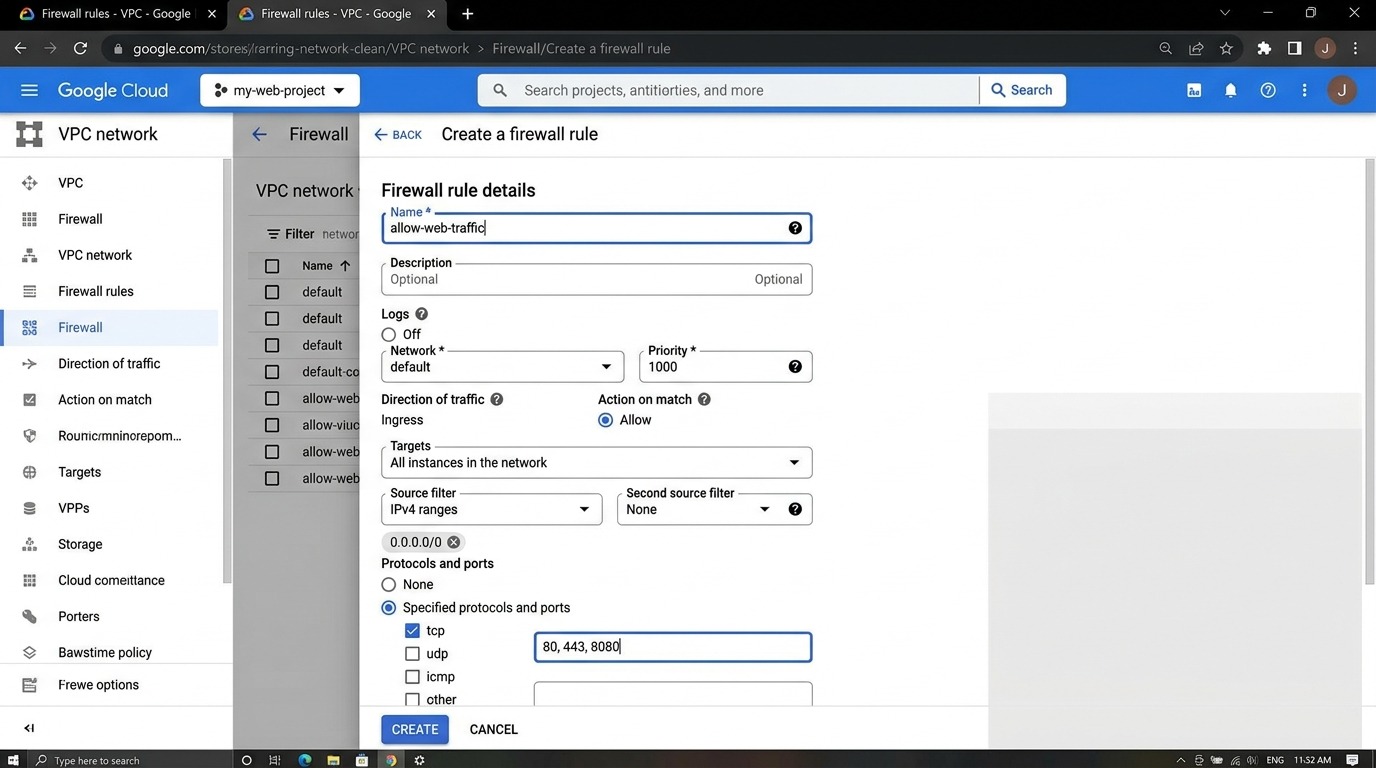
Figure 3: VPC Network — Creating a Firewall Rule allowing Ingress TCP traffic on ports 80, 443, and 8080 from anywhere (0.0.0.0/0).
| Rule Name | Direction | Protocol / Port | Source IP Range | Purpose |
|---|---|---|---|---|
| default-allow-ssh | Ingress | TCP: 22 | 0.0.0.0/0 | SSH Remote Terminal Access |
| allow-web-traffic | Ingress | TCP: 80, 443, 8080 | 0.0.0.0/0 | Public Web & Container Traffic |
| allow-custom-dev | Ingress | TCP: 3000, 5000 | Your_IP/32 | Development & CI/CD Testing |
After clicking Create at the bottom of the page, Google Cloud provisions the virtual machine in 15–30 seconds. On the VM instances dashboard, your instance will show a green checkmark status ✔ Running with its assigned Internal IP and External IP.
Under the Connect column, simply click the blue SSH button.
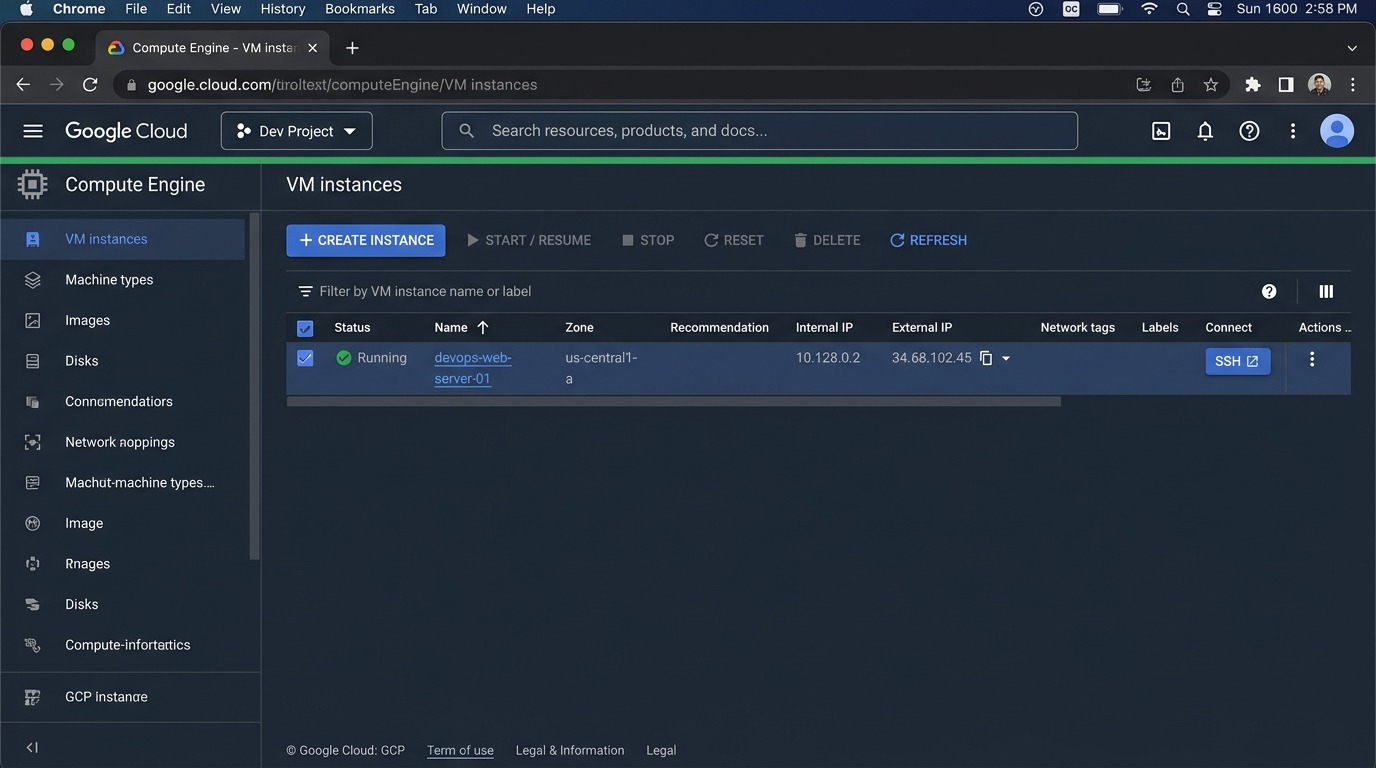
Figure 4: Compute Engine Dashboard displaying active VM 'devops-web-server-01', External IP, and the Connect SSH button.
Clicking SSH opens a secure, in-browser terminal session connected straight to your Linux virtual machine. Deploy an Nginx web server by running the following commands:
sudo apt updatesudo apt install nginx -ysystemctl status nginx
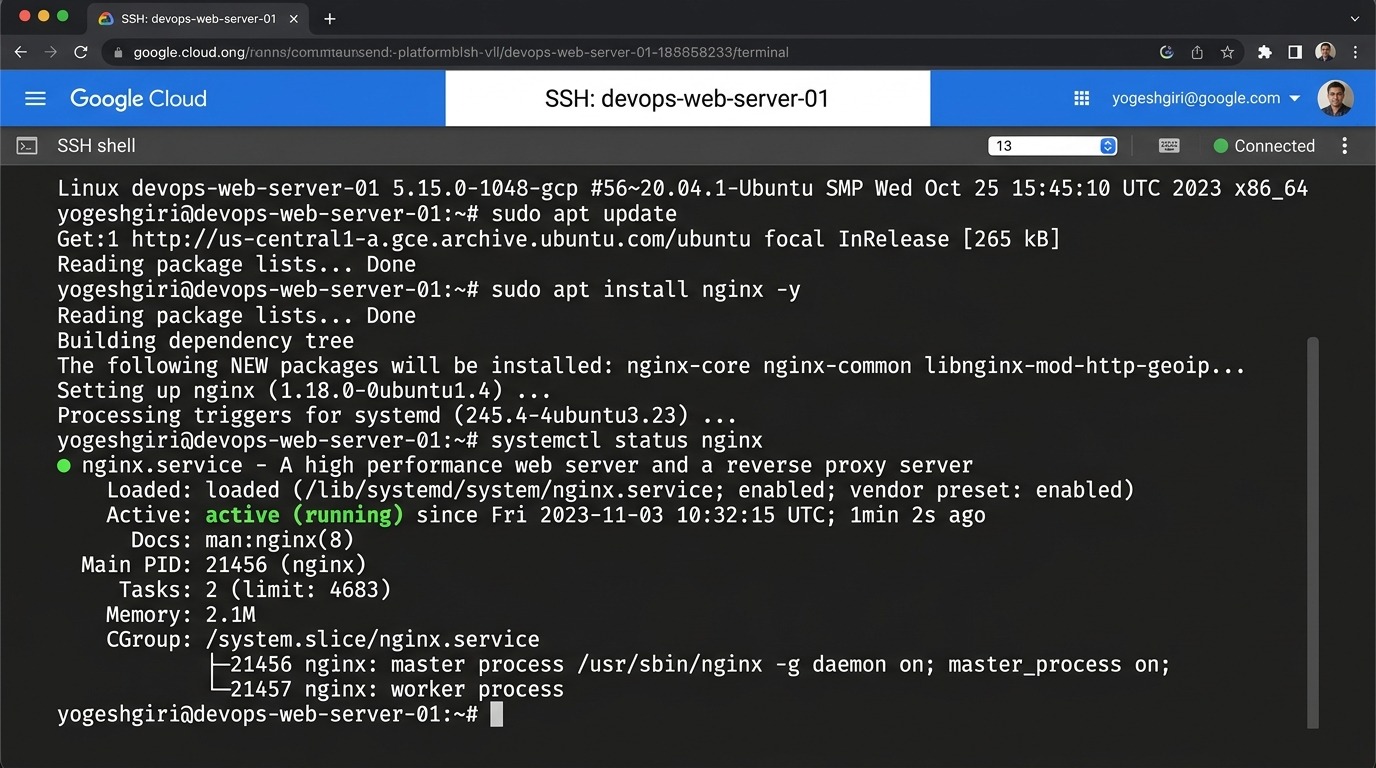
Figure 5: In-Browser SSH Web Terminal — Installing Nginx and verifying active (running) service status.
Open a new browser tab and navigate to http://<YOUR_EXTERNAL_IP> (e.g. http://34.68.102.45) to view your live Nginx web server running directly on Google Cloud!
To avoid consuming your free credits when not actively using the virtual machine:
⋮.Congratulations! You have mastered: